


and thought I should do some jotting.
Mother put me up to this the other day, mentioning that she now exclusively eats her own home-made soda farls instead of buying loaves that she can't finish on her own. It dawned on me that I'd never made soda farls myself, ever. So I went on a quest for a gluten-free version, motivated in part by the imminent demise of my bread machine, which still bakes, but no longer heats during the proving stages. I found some good recipes, among them Living Wheat-lessly, but was hampered by the rundown of the store cupboards before we go off to Sweden on Sunday. Finally desperation drove me to knock something together yesterday lunchtime, when we ran out of bread of all varieties. Hence the following.
The first lot were white, the second "wholewheat" - not really wholewheat, obviously, otherwise I would be in a very bad way atm, but fake gluten-free whole-fibre-ish.
Anyhoo, the flour blend for the first batch was:
8oz Rice Flour
8oz Tapioca Flour
8oz Soy Flour
Sorry about the Imperial units, but this was left over from a blend in a US book, so it's either cups or ounces I'm afraid. And I have learned to my cost (my nummy, nummy cost) that a US cup has nothing whatsoever in common with my coffee mug.
Mix 10.5 oz from this flour blend with 3/4 tsp baking powder, pinch cream of Tartar, and 1/2 tsp salt.
Rub in 3 tbsp cold butter (I use Stork).
Add 1 tbsp sugar (but see next recipe), mix and put a well in the middle.
In another large bowl, beat 2 eggs, mix in 8 fl oz natural yogurt, and add 1/2 tsp baking soda, whisking like mad.
AT THIS POINT YOU NEED TO START MOVING LIKE BUGGERY. The yogurt and baking soda mixture will start fizzing, and you need to combine it with the flour as if the very hounds of Hell were baying at your heels for the lickings.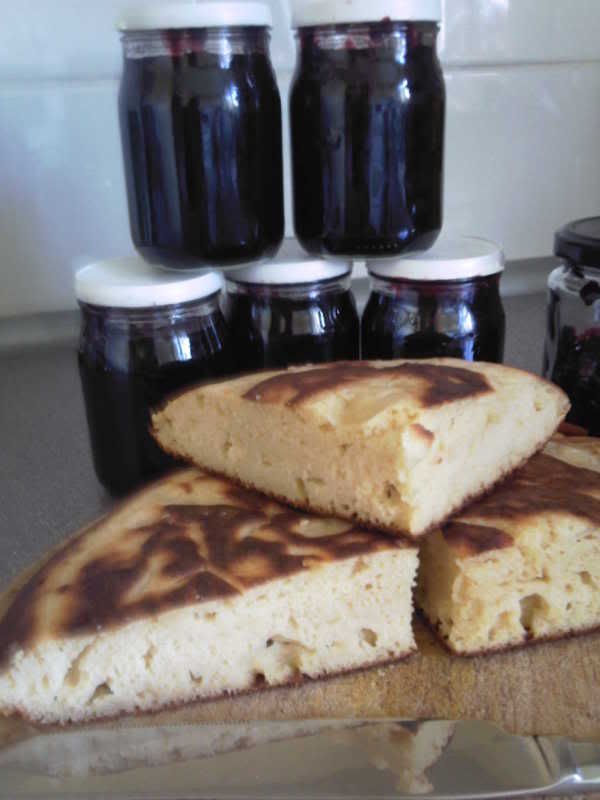
It was a bit rubbery - no doubt because I put 2 eggs in instead of one - and too sweet for my liking, although I would consider it as a basis for a fruit soda. There it is on the left - with my home-made blackberry jam in the background, made from berries picked by the Mighty Offspring himself, awww...
The second lot uses this flour blend:
8oz Rice Flour
8oz Tapioca Flour
8oz Quinoa Flour (because I was out of Soy, hah! and quinoa is also a high-protein flour)
The same method - 10.5 oz flour blend with 3/4 tsp baking powder, pinch cream of Tartar, and 1/2 tsp salt, rub in 3 tbsp butter. NO sugar, but instead add a goodly fistful of toasted soya bran, available from Holland & Barrett.
Prepare buttermilk by mixing 8 fl oz milk with 1 tbsp vinegar, then mix in 1 - not 2 - beaten egg, 1/2 tsp baking soda: this will also fizz, but a little slower. You still need to get a wriggle on.
It was a little crumbly when I tried to cut it when still warm, but turned lofty and elastic when cold, just like it should be. The lack of sugar was perfect - it was just the right degree of tangy and savoury. The slight bitterness of the quinoa also works well for this faux wheaten: soy flour would be just a bit too soft and waxy. It's not overly wholewheaty, more like the soft, spongy Ormo wheaten loaves than the nutty bricks of my childhood, but I was going easy on the soya bran for this experiment. Next time, though...
You'll notice neither recipe uses xanthan gum, guar gum, or powdered milk, which would be quite usual in GF baking: they provide the rubbery, gluey sponginess of, well, gluten. It's not actually essential that soda bread has this sponginess, though; it doesn't have that character even when made with wheat. But I did wonder why the second farl wasn't as crumbly as I'd expect. The first obviously got its extreme sponginess from the accidental egg overdose, but that wasn't the case with the second. Then I remembered: milk + vinegar + heat = casein plastic!
Mwhahahahahaha!
Friday, August 21, 2009
I just made some gluten-free soda farls...
Friday, June 20, 2008
I made a new knitter...
And here he is:

So proud of his work -
About a fortnight ago, my son, aged 2yrs 8 months, demanding to "do knittings". I grabbed the camphone, then got out an old pair of needles and my bag of scraps (priorities, m'dears, priorities). He picked the "lello woo" himself because it looked like Josie Jump! He's still asking for his knittings occasionally, though we've moved on to pink wool after an unfortunate potty-related incident with Josie...


 As to my knitting, I have finished yet another couple of pairs of socks for my Blondy Bear. I got a variety of colours of 4-ply Teddy Enriched 25% wool in the Bullring and hope to make as many combinations as possible.
So far, I am tackling the light blue and claret shades, which are coming up at a gauge of about 12st / in. The first is the striped pair: just 4-row stripes, one of which is split across the heel. Both colours are held together on the heel and toe. I'm planning to make two more pairs in this colour combination, one of which is almost finished - again stripes, but in the combination AABAA BBABB. These are the strip colours of Aston Villa, a football club here in our fair city of Birmingham. A few years ago, The Villa were going through a reversal of fortunes - good or bad I can't say - and there was a slogan about it - again it may have been coming from disappointed fans or enraged supporters of other teams, I don't know. The slogan was "Sh*t on The Villa", from which I named this project "Socks on The Villa". I'm such a wit.
The second pair is in the light blue only, with a little mock cable running down the sides - k through back of 2nd stitch on left needle, k through front of 1st stitch and 2nd stitch and remove from l needle. The next pair will be in claret, and I'm toying with making them ribbed on the leg.
 I have started a little jacket for him as well, purely because I fell in love with the yarn... And it's variegated!! Quelle horreur! Teddy Colorama Colour Keyed Chunky. Actually, I fell in love with the DK, then noticed the same colourways were available in chunky. It's a simply beautiful melange of greens, creams and browns, some long runs and some short giving stripes, spots and chevrons. Of course the gauge is all off. The pattern calls for 10st x 13r on 9mm needles, which would be too large for this yarn, which is on the low end of chunky. The ballband recommends 3.75mm needles (15st x 20r) - ridiculously tiny for chunky yarn. I’m getting 14.5st x 20r on 6mm needles. I also decided to Zimmermann it - knitting seamlessly. Except for the pockets which I didn’t stop to understand - they’re attached at the bottom as per pattern (but there’s a BO edge in the body), and at the top as per a sort-of 3-needle bind-off of mine own devising which isn’t BO but instead melds into the body. If I had taken time to understand the pattern I would probably have done some sort of pick-up and bind off to anchor the side of the pocket, and possibly a Fig-8 cast-on onto a dpn at the bottom to knit the whole pocket attached, which would have the added advantage of not interrupting the striping-ness of the yarn. Sadly, it was all on my snazzy new computer which decided to die, so I'm a little stalled until it's fixed.
 Finally, for a colleague who's going on maternity leave soon, there's a Presto Chango, one of the cleverest ideas I've ever seen for babywear. The body is in blue Robin Bonny Babe Aran, and the insert(s) is (are) a mystery Aranweight cotton found in the Bullring. I just have to knit one more insert, for which I'm checking through my Aran pattern books. She's expecting a boy, and the pattern's lace insert looks a bit girly to me... Not that she's likely to put it on the child - from the sounds of things, the sprog won't see anything less than Armani. And that's just the nappies.
I had a clever idea, aka hints n tips, recently. Using i-cord to re-create the effect of Aran barleytwists if you don't do Aran knitting, or to create your own non-canon shapes and designs. Just make huge quantities of i-cord (a job for a child with a new French Dolly?), lay it out in the shape, then sew to the knitted piece.
Gosh I'm good.
Tra
K
Friday, October 12, 2007
Hurrah!
The Gothic Aran is finished!
Apart from one thread inexplicably left hanging from a sleeve, it is done, laundered, and tried on by a very chuffed hubby. Back-to-front at first, being himself, but ye gods what a fine fit when it was on. I short-rowed the back of the collar as prescribed in EZ, which was rather nasty with the moss-stitch panels, but what a difference it makes. Fits him like a glove. Pics later, once my camphone is recharged.
IBC's Bob the Builder sweater is well under way. I'm putting the face on the front - it's up to the mouth atm - and the logo on the back, which I haven't got to yet. The sweater shape is reversible (front same as back, not inside-out reversible), so it would be nice to have a different view on each side. I'm knitting in the round again. I read somewhere that intarsia couldn't be done in the round, but didn't get why, since Fair Isle is traditionally knitted in the round. Now I do. Duh. Wool ends up at the wrong end of the knitting. I've got a partial solution which cuts down on the bitties of yarn hanging at the sides: leave a long tail when starting a new colour, that can then be used to knit the next row. In the case of the outlining black yarn, the tail may be enough to complete all stitches required.
And I've started a little something for Halloween - rush job, special request from TH. Fingers crossed...
Wednesday, September 19, 2007
Bwahahahahah!
According to mum, SIL is delighted with the Drops Norwegian set I sent her, and the ba hasn't been out of it since! She was thrilled with the colours and the pattern, and was particularly floored by the label.
Pics to follow once mum sends them over...
Hubby's sweater grows apace. I have the body completed to the EZ seamless sweater join-up point, and one sleeve almost done after a bit of a hunt for 6mm dpns - I had to settle for 40cm circs in the end. I also had to adjust for TH's elongated torso, as he's 6'1" but his chest's barely 36". I've decided to do the collar as a polo neck, so he can roll it up or down as the weather dictates, and I'll probably have to twiddle the decreases so they don't interfere with the Aran panels. TH can't wait to get his Goth Aran!
I've also begun the calculations for a version for my son - I think the panel plus 7st to either side will be big enough for his wee chest. don't know about the sleeves yet. I've also found a Bob the Builder chart which I might try on the grey marl background, and a Thomas the Tank Engine one currently under consideration. So that's four ideas for him so far, including the Drops!
My own pinwheel cardi has stalled because - aaargh! - I'm running out of wool. As it's vintage, the chances of getting any more are pretty much nil. And it's RED, so I'll never match it... So I have to finish the sleeves, see how much wool is left, then unravel or devise a trim to suit.
And God help me, I want to knit socks...
Wednesday, September 12, 2007
More hats and a scarf
 Back when I started knitting again, I went on a bit of a hat-making frenzy - partly because hats are quick projects, partly because Ickle Baby Cthulhu was fast growing out of the many hats we had - indeed, many never fitted in the first place. I don't want to sound like my SIL, but IBC's head is HUGE! Thank God for c-sections. He's not even 2 yet and all his little sunhats this summer were age 6 sized. Otherwise he is but a sturdy 12 to 23-month size.
The first ever hat I made for him was Lion Brand's free pattern Strawberry Patch Cap. I did check most carefully for equivalent-sized yarn - Lion Brand is not to be found here - but I did not do a swatch, haha! I rarely do, naughty me. I do try to match up the right needle-to-yarn size unless I'm going for a particular effect, but it's easier to knit a bit of the pattern, see how it's going size-wise, then frog if necessary and knit a different size given in the pattern (assuming I'm actually following it that religiously) - so if my 36in chest size sweater is coming up a 40in, I knit up the 32in size instead. Easier than faffing about with gauges. Obviously the 32in pattern is going to be shorter, but I always measure it off on the wearer rather than rely on the pattern - on the few occasions when I've done swatches, if I got the stitch-gauge right the row-gauge would be skew-wheef. Elizabeth Zimmerman recommends ignoring row-gauges and measuring your work for the intended wearer as you knit, and who am I to argue with someone who made a living knitting?
I used red and green acrylic DK from a pound shop. It was soooo sweet, though TH didn't approve - it's okay for IBC to wear a leopardskin fun-fur hat with horns, made by one of TH's friends, but wearing a hat made by his mummy might give him a complex, it seems. Or wearing a cute and eminently suitable sailor suit to a wedding. Bah. Sadly, IBC tipped it out of his pram and it's never been seen since, so this is the only evidence of its existence. Quite Tyrolean I thought. The next one was a Knitty pattern called Baby Tart. As I had green DK left over from the Strawberry Patch Cap, I did the "pie" bit in green, and used some black DK for the "filling", as sepals and berry. I call it the Blackberry Cap, or the Blackberet, hnurh, hnurgh, hnurh. I had real bother with the pattern for the bobbled berry filling - maybe it was having to look in 3 different places to work it, but it didn't make a whole lot of sense to me. Not one I'll be repeating, I think. TH again not appreciative of my artistry, and IBC ungratefully had a growth spurt before it was done.
 I also crocheted the Pompom Hat from Craftown, in black DK with a red stripe around the hatband. However, after a couple of tries I abandoned the pattern and constructed it by measuring off IBC.
 Last October I started working at the school, leaving IBC with a childminder during the day. This entails wheeling him across an exposed and windy area in less than clement weather twice a day. Anorak hoods wouldn't stay on, and throwing hats out of the buggy was tremendously entertaining, so I hit on the idea of making a balaclava. After quite a search I found a straightforward one on knitlist. Naturally I made it up in basketweave stitch rather than the stitch pattern recommended, just to be awkward. It was amazingly easy to make up, and IBC can't whip it off - result!
 It left a bit much of his face exposed, and, since I had some black and green DK left, I made a second one. This I made a bit longer in the head, and with longer ribbing round the face. Also when I picked up the stitches for the ribbing round the front, I used the same short-rowing technique for the top flap of the balaclava to build up the 'chin' section to cover his mouth and nose. The ribbing kept this piece elastic enough to pull down if it wasn't too cold, which was an unplanned bonus. The black and green pattern was supposed to look like dragon scales, but this was not so successful... TH attempted some dry wit by suggesting I knit him an armalite to go with it.
 I've since made a purple version, with purple ostrich fancy yarn twisted along with the yarn for the ribbing round the face only, for a little girl his childminder also looks after - her favourite colour, and she and her mum loved it. No photos though. The ostrich yarn fluffed out really nicely, like the furry bits on the hoods of those snorkel anoraks all the kids used to wear when I was young. Er. Definitely -er.
So to the scarf. Made in beige (MC) and turquoise (Contrast) ostrich yarn for the ex-manager of the Hub Hazelwell when she left for her new job. Quite simple, just with a hole in the middle about a third of the way along, done by just knitting up the first half of the stitches to the desired length, breaking off the yarn and rejoining it to the remaining stitches, knit up to the same length, then just knit across all stitches as normal to the end. You don't even need to put the non-worked stitches on a stitch-holder, just leave them on the needle. In fact you could be making trouble for yourself, transferring ostrich yarn onto and off stitch-holders. Don't do it. Mommy says so.
Friday, July 20, 2007
Eyelash Shrug
My sister was invited to a rather posh wedding a while ago. She really had nothing suitable to wear - she lives in trackies and trainers and has virtually nothing else. Over the years of trackiedom she'd also lost all sense of glamour, colour, shape, etc and had a hard time finding something to wear. She hadn't even tried on clothes in the shop in about 9 years! Since her evil ex took over her life and decreed that any attempt at looking nice clearly meant she was trying to pick up other men...
In the end she found something that tbh sounded like a trackie dress - i.e., thoroughly lacking in oomph. More phmoo really. Blackish-brown, straight-fitting (which means loose on her), nothing interesting in the way of pattern, fabric, embellishment.
About a week beforehand, she was complaining on the phone to me that she was worried that it wasn't 'grand' enough for the bash, wondering if she should go out and look for something else. And I had an inspiration. I had some lovely glossy black eyelash yarn that I'd bought intending to make myself a shrug, but I hadn't got round to it. Without saying a word to her about this, I figured if I really went for it, I could make it up over the weekend, post it on Monday, and she'd have it Wednesday at the latest. I got off the phone as fast as possible, mumbling something about her not being an important member of the wedding party or anything, who was going to notice what she wore, yada yada. Whipped out the needles and yarn and cast on loosely - Long-tail Cast-On works for me.
The pattern is based loosely around one that I lost yonks ago, no idea where I got it in the first place. It is however burned into my brain for all eternity. Well, sort of. Start by casting on 34st, increase 1st on BOTH ends of every 3rd row by making 1 (M1) into the second st from either end, until there's a total of 50st. Then continue straight for the required length, and start decreasing (k2tog the 2nd and 3rd sts from either end) on every 3rd row until there are 34st left, cast off. See? easy peasy.
I do not, of course, remember the yarn weight, needle size, gauge... But shrugs are flexible! That is the beauty of the things! They do not HAVE to have wrist-length sleeves, they CAN be a bit skimpy, so even if you totally foul up the gauge, or don't have the measurements of the recipient, or any of the millions of other things that can go wrong, it doesn't matter!! A shrug in its simplest form is just a wide rectangle, long enough on its long side to go across the recipient's back - but if it isn't, just borrow a bit off each sleeve so they're shorter. It doesn't matter. I do have one handy hint though - if it's to be a surprise gift, you can get a rough idea of the right size by finding out how TALL the recipient is. The distance from fingertip to fingertip of outstretched arms is equal to height. Knock off 6-8in for the length of the (adult) hands and you have an idea how long the shrug should be from cuff to cuff.
For example, I'm 5'6", with biggish hands, roughly 7in.
5'6" = 66in, minus 2 hands at 7in each (14in) = 52" from wrist to wrist.
Anything shorter than this is fine for a shrug.
I think it was a simple lace pattern - yarn-over between stitches on one row, drop the yarn-over on the next, repeat till you're fit to be tied with boredom - but, obviously, I is not jiggy wit da boredom. As the groovy young things say. And the effect of any lace stitch is wasted with eyelash anyway, as the fluffs hide everything but the 'hole'. So I used one 10mm needle to simulate the yarn-over rows and a 4mm needle for the 'drop' rows.
Wow! Two top tips in one post!
I only did the lacy bit up to approximately the elbows, then switched to two 4mm needles for the section over the upper arms and back, then back to the 10mm and 4mm needles for the other sleeve. Suspended bind-off gives a nice loose edge for this project. Sew up the lacy section of both sleeves right up to about 1-2in of the non-lacy middle section. The type of sewing up doesn't really matter, as the fluffiness of the yarn disguises the neatiness/tidiness of the stitchwork - I've even crocheted up the sleeves on some of these shrugs and it's not noticeable. Then, to tart it up a bit, I threaded a length of 1in black ribbon through the top row of holes in the lace and tied it in a bow opposite the seam - the bow is then on the outside of the arm. Finito! Sister was thrilled with it, and got loads of compliments at the wedding. So much so that she went all Hyacinth Bucket and told people that she had a "little woman" run it up for her! and no, she didn't really want to say who, or how much her "treasure" charged. Mainly because she had no idea how much something like that WOULD cost, although I think she was alarmed at the figures people were suggesting, to try to winkle the info out of her - "was it more than £150? that's what X charged for my twinset last year and it wasn't this nice", etc. (Sis and I are both frequently alarmed by what people will pay for clothes that aren't anything special. The tight-fisted gene is a terrible curse sometimes). She even got asked if the entire ensemble was run up by her "little woman"!
Not bad for a Primark outfit and a few balls of yarn from a poundshop...